How to Set Up a PDQ (Payment Terminal) on BOB CRM
This guide explains how to configure a Dejavoo PDQ terminal within BOB CRM and link it with your POS system for seamless payment processing. Follow the steps below to ensure a successful setup and integration with iPOS.
Step 1: Navigate to PDQ Settings in BOB CRM
Open BOB CRM.
Go to the menu:
Info > PDQ > PDQ Legacy View > Add PDQ
(Refer to screenshots below for guidance)
Step 2: Add PDQ Details
After clicking Add PDQ, a form will appear. Complete each field as outlined below:
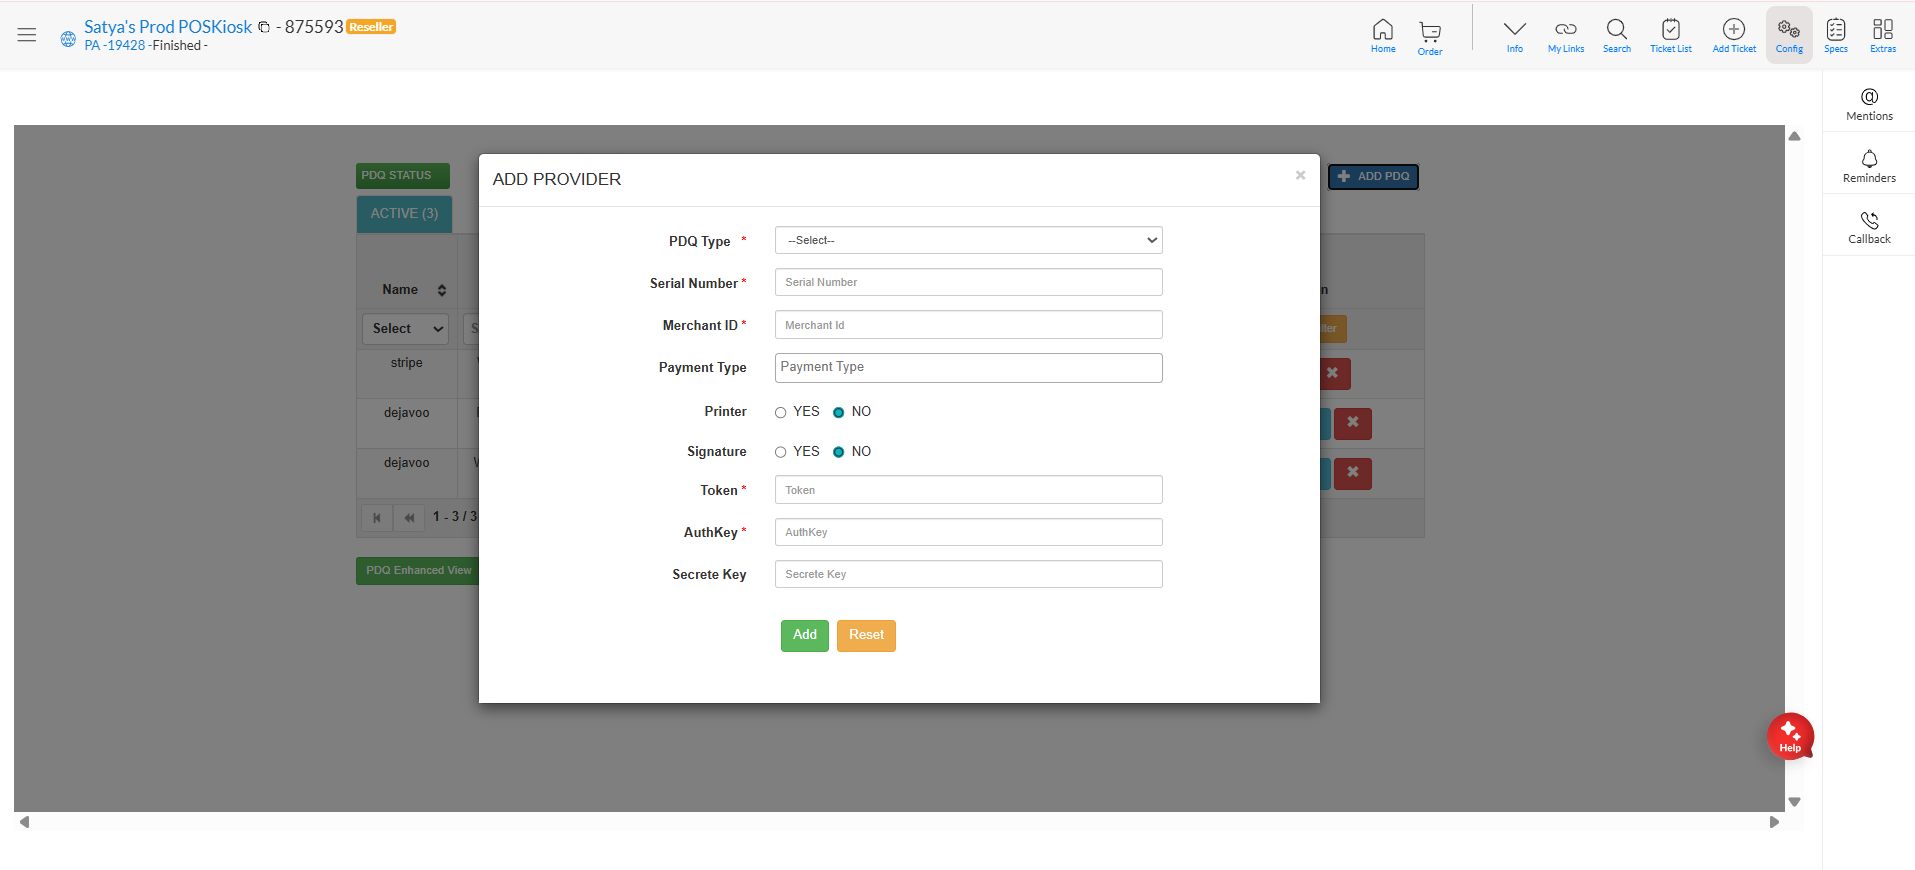
| Field | Description | Example / Source |
|---|---|---|
| PDQ Type | Select the terminal type from the dropdown. | Choose Dejavoo |
| Payment Mode | Default selection should remain unchanged. | PDQ Terminal |
| Serial Number | Enter the serial number found on your Dejavoo device. | From device label |
| Merchant ID | Enter the TPN number from iPOS. | Found in iPOS under Merchant details |
| Payment Type | Choose the payment type. | Credit |
| Printer | Enable printing capability. | Select YES |
| Signature | Enable signature capture. | Select YES |
| Token | Retrieve from iPOS → Merchant → TPN → Edit Param → Integration → Auth Token | Copy the token value |
| Auth Key | Retrieve from iPOS → Merchant → TPN → Edit Param → Integration → Auth Key | Copy the key value |
| Field | Description | Example / Source |
|---|---|---|
| PDQ Type | - Select the terminal type from the dropdown. | Choose Dejavoo |
| Payment Mode | - Default selection should remain unchanged. | PDQ Terminal |
| Serial Number | Enter the serial number found on your Dejavoo device. | From device label |
| Merchant ID | - Enter the TPN number from iPOS. | Found in iPOS under Merchant details |
- Log in to the iPOS portal.
- From the left-hand menu, click on “Merchants.”
- In the search bar at the top, type the account name (e.g., Zuppler).
- From the search results, select the desired merchant account and then copy the desired TPN (Merchant ID) and paste it under Merchant ID section on BOB
| Payment Type | Choose the payment type. | Credit |
| Printer | Enable printing capability. | Select YES |
| Signature | Enable signature capture. | Select YES |
| Token | Retrieve from iPOS → Merchant → TPN → Edit Param → Integration → Auth Token | Copy the token value |
| Auth Key | Retrieve from iPOS → Merchant → TPN → Edit Param → Integration → Auth Key | Copy the key value |
Step 3: Review and Save
Double-check all entered details for accuracy.
Once confirmed, click ADD to save the new PDQ configuration.
Step 4: Configure and Connect the PDQ on POS
After the PDQ is configured in BOB CRM, follow these steps to link it with your POS system:
Open the POS application and open Fusion App.
Navigate to: Settings > Store Settings > Configured PDQ
From the list, select the correct terminal by matching the serial number.
Click Save to confirm your selection.
Your POS is now linked to the PDQ terminal, and transactions can be processed seamlessly.
Important:
If the terminal is not configured on the POS, the order screen will still show the Card option to close the order, but it will not actually charge the customer’s card.
Always ensure the correct terminal is selected in the POS settings to avoid this issue.
Related Articles
Zuppler POS & Kiosk Onboarding Checklist
Please refer this checklist and execute the manual steps in BOB CRM when onboarding a restaurant with a Zuppler POS or Kiosk. Adding a Zuppler Tablet/Printer should be a one click setup, orders will flow to the tablet once the tablet is added from ...Dejavoo Command and Communication Center
Overview The Command and Communication Center is a feature on the iPOSpays portal that enables us to remotely control merchant payment terminals and communicate with them by sending commands or messages. This can help us efficiently perform some ...Dejavoo Offline Mode – Setup and Usage Guide
Overview Dejavoo Offline Mode allows a store to accept card transactions even when the terminal is not connected to the internet. This feature is particularly useful during temporary network outages, ensuring that business operations can continue ...Setting Up Surcharge in Dejavoo
Setting Up Surcharge in Dejavoo If a merchant is utilizing surcharges, you will first want to ensure the profile is set to 'with fee'. Once selected, you can continue to add the merchant information as you normally would. If a merchant was already ...Clover Printing Troubleshooting
This article guides you through the troubleshooting steps you can follow if a restaurant reports that their online orders are not printing through the Clover POS printer. Zuppler<>Clover Connection The connection between Zuppler and Clover is ...